Why You’ll Love These Treats
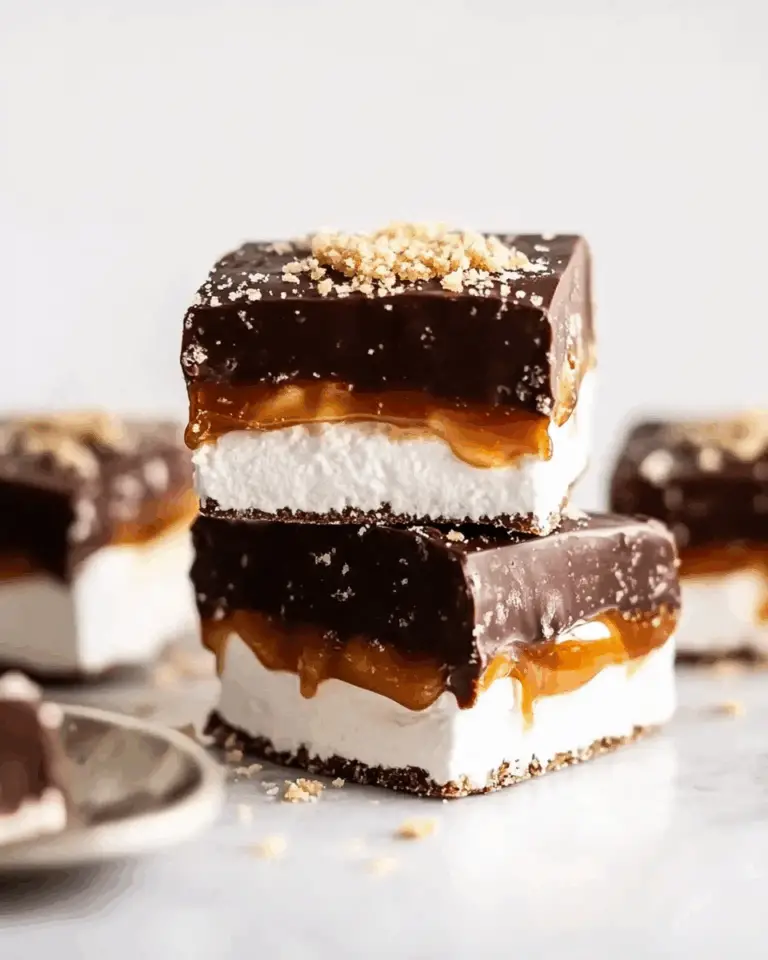
There’s something magical about s’mores—the balance of fire-toasted sugar, rich chocolate, and crunchy graham—but these gourmet s’mores marshmallows manage to distill that magic into a treat that’s mess-free, portable, and perfect for any season. Here’s why they’re worth the effort:
-
Handmade marshmallows are softer and creamier than store-bought, and incredibly rewarding to make.
-
The salted caramel layer adds depth, complexity, and that irresistible sweet-salty combination.
-
A glossy coating of dark chocolate ties everything together and creates a satisfying shell.
-
A sprinkle of graham cracker crumbs pays homage to the classic flavor profile while adding a delicate crunch.
-
These marshmallows are stunning for gifting or entertaining and can be made ahead of time.
Even if you’ve never made candy before, this recipe is approachable with the right tools and a little patience—and the results are next-level delicious.
Flavor and Texture Breakdown
Each S’mores Marshmallow is a multi-sensory experience:
-
The marshmallow base is light, airy, and delicately sweet with notes of vanilla and a melt-in-your-mouth texture.
-
The salted caramel adds a silky, buttery richness and a subtle briny contrast that balances the sweetness.
-
The chocolate coating provides a deep, bittersweet bite and a glossy finish that seals in flavor and freshness.
-
The graham cracker dusting contributes a nostalgic aroma and a slight crunch that echoes the classic s’mores feel.
Altogether, it’s a gourmet candy bar-meets-marshmallow hybrid that’s decadent but perfectly balanced.
Tips for Perfect Homemade Marshmallows
Working with marshmallows and caramel requires some timing and technique, but it’s easier than it looks when you follow a few essential tips:
-
Use a candy thermometer for accuracy, especially when cooking the sugar syrup. Hitting the right temperature (240°F) is key to getting the correct marshmallow texture.
-
Whip the mixture for the full 15 minutes to build volume and firmness. The mixture should be thick, glossy, and voluminous.
-
Grease or dust your tools with powdered sugar or cornstarch to prevent sticking during cutting and handling.
-
Allow marshmallows to set for at least 4 hours, or overnight if possible, to ensure they’re firm and sliceable.
-
When making caramel, don’t stir the sugar too early—let it melt and caramelize on its own to avoid crystallization.
-
Let the caramel cool completely before assembling to avoid melting the marshmallow.
Assembly and Dipping Tips
Once you’ve made the components, assembling your S’mores Marshmallows is a fun, creative process:
-
Cut marshmallows into equal-sized cubes (about 3″x3″) for consistency. A greased or powdered sugar-coated knife works best.
-
Spoon or pipe the caramel onto the center of each marshmallow cube, spreading gently with the back of a spoon.
-
When dipping in chocolate, use a fork or skewer to lift each marshmallow and let excess chocolate drip off before placing on parchment.
-
Sprinkle graham cracker crumbs immediately while chocolate is still wet so they adhere properly.
-
Let them cool at room temperature or in the fridge until the chocolate is fully set.
You can also decorate with mini marshmallows, edible glitter, or crushed nuts if you want to personalize your batch even more.
Serving Ideas
S’mores Marshmallows are perfect on their own, but they also make incredible additions to dessert boards, party platters, or hot cocoa toppings. Here are a few ways to serve them:
-
Packaged in cellophane bags with ribbon for party favors or gifts
-
Skewered on sticks for marshmallow pops
-
Sliced in half and served on top of brownies or cupcakes
-
Used as a garnish for cocktails or gourmet s’mores martinis
-
Torched lightly with a kitchen torch for that campfire-charred edge
You can even use them as a centerpiece treat for weddings, holiday parties, or birthday dessert tables.
Make-Ahead and Storage Tips
These marshmallows store surprisingly well, making them a great candidate for prepping ahead of time:
-
Store in an airtight container at cool room temperature for up to 1 week.
-
If your kitchen is warm, store in the refrigerator, especially if using caramel and chocolate.
-
Do not freeze—freezing will ruin the marshmallow texture.
-
Place wax or parchment paper between layers if stacking to prevent sticking.
-
For gifting, package with moisture protection, like food-safe cellophane or individual wrap pouches.
You can also make the marshmallows and caramel separately in advance, then assemble and dip as needed for fresher results.
Creative Variations
While this version stays true to the s’mores vibe, there’s room for innovation. Try:
-
Peanut Butter S’mores Marshmallows: Add a dollop of peanut butter under the caramel.
-
Spicy Mexican Chocolate: Mix cinnamon and cayenne into the chocolate coating.
-
Espresso-Caramel: Add a splash of espresso to the caramel for depth.
-
White Chocolate + Freeze-Dried Berries: Use white chocolate and sprinkle with crushed raspberries or strawberries.
-
Nutty S’mores: Add chopped toasted pecans or hazelnuts before dipping.
These ideas not only expand the flavor profile but make your marshmallows stand out for special occasions.
Conclusion
These S’mores Marshmallows are the kind of treat that turns a childhood favorite into something worthy of a gourmet bakery. Combining homemade marshmallows, luscious salted caramel, dark chocolate, and graham cracker crumbs, they capture all the nostalgia of campfire s’mores in an elegant, indulgent, and portable package.
Whether you’re treating guests, gifting friends, or indulging your own sweet tooth, this dessert offers the perfect mix of handmade charm, rich flavor, and stunning presentation. And with endless ways to customize them, you’ll find yourself returning to this recipe again and again—for holidays, parties, or whenever your inner kid wants a grown-up version of a favorite snack.


